So as I promised in the earlier posts, here is how you create an artefact. In this post I will explain how to create a gadget which can be deployed in WSO2 Gadget Server and viewed from Gadgets' portal.
1. Create a cApp project as in here.
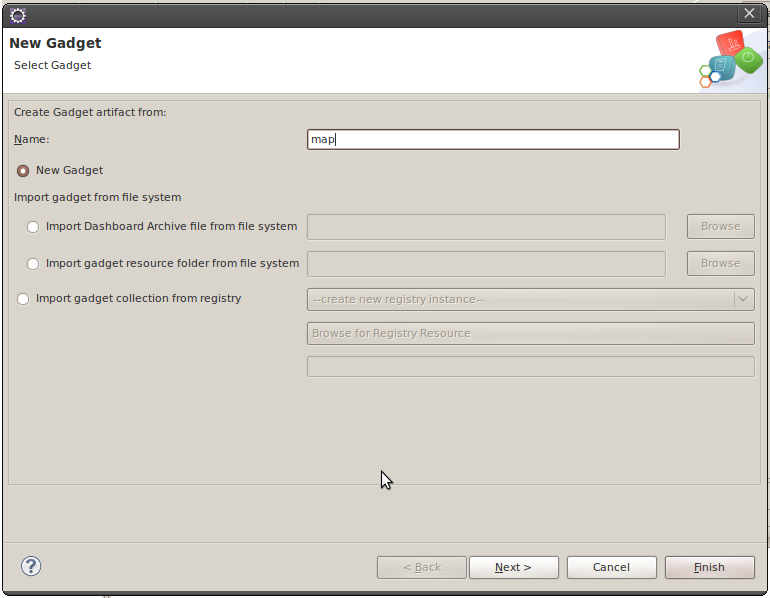
2. Create a gadget artefact.
Click on 'Create New artefact' button in root-artifact.xml in your cApp project and Select "Gadget" OR Right click on the cApp project you created and Select "Gadget". You will get 'New Gadget" creation wizard.
At the 'Name' prompt, give your gadget artifact a name and proceed.
In the next screen, specify a name for the folder containing you gadget specific artifacts and finish the wizard.
NOTE: The project that you will be creating the artifact in will appear selected in this window. If you want you can change it here.
So after this initial step you should have your project structure like this:

3. Develope the gadget code.
WSO2 cApp loads open social development environment (OSDE) in Eclipse. This is one of the plugins that is getting installed with cApp. So if you double click on your .xml file (maps.xml in my case) you will have the OSDE opened up on the right side of the IDE.
Now lets fill in the gadget code. The code that I am going to put in is a sample taken from googles gadget docs (http://code.google.com/apis/gadgets/docs/fundamentals.html#location).
In the proceeding steps I will show you how easy it is to create and deploy this using cApps.
<?xml version="1.0" encoding="UTF-8" ?>
<Module>
  <ModulePrefs title="Map of __UP_loc__" height="300"
    author="Jane Smith"
    author_email="xxx@google.com" />
  <UserPref name="loc"
    display_name="Location"
    required="true" />
  <Content type="html">
  <![CDATA[
    <script src="http://maps.google.com/maps?file=js" type="text/javascript"></script>
    <div id="map" style="width: 100%; height: 100%;"></div>
    <script type="text/javascript">
    var prefs = new gadgets.Prefs();
    var map = new GMap(document.getElementById("map"));
    map.addControl(new GSmallMapControl());
    map.addControl(new GMapTypeControl());
    var geocoder = new GClientGeocoder();
    geocoder.getLatLng(prefs.getString('loc'), showMap)

    function showMap(point) {
      if (point!=null) {
        map.centerAndZoom(point, 6);
      }
    };
    </script>
  ]]>
  </Content>
</Module>
And it is as simple as filling the tabs that you find at the bottom your IDE (see the image below).

ModulePrefs such as title, author, author_email can be filled in Basic tab - 'Attributes' section, fetures can be put in 'Features' section of the same.
I have a UserPref, 'loc' in my gadget which I created in 'UserPref' tab and yes I made it a required parameter. Since it doesn't have a default value I kept that option empty and I stick to default 'String' data type.
Then in the 'Content tab', I added my content. Click 'Add' button in 'Content' tab and say its an 'html' content (as you see in above code it is Content type="html"), and since I go by default view I can leave 'view' type empty.
After you do that, you will have an entry created for the view that you added just now and now you need to fill in the 'Content' to it. So fill in 'Content'; This includes all things you put within CDATA tags.
NOTE: You DON'T need to type in <
4. Add the gadget to server's gadget repository.
You need to have a WSO2 Gadget Server binary distribution with you. Download it from here, extract and you are ready.
While in J2EE perspective in eclipse, go to Server area and add a WSO2 Gadget Server as described here. This will let you start the server from within eclipse.
After you started the server; Login to Gadget Server admin console and navigate to '/_system/config/repository/dashboards/gadgets' folder in internal registry. You will see the gadget that was deployed from cApp in here.

You can view and edit your gadget code from here.

Now that we saw the gadget having deployed in the Server from cApp, we have to follow two more steps to make it available in Gadgets' portal where it is actually used.
i. Grant anonymous user permission to the gadget.
For this navigate to '/_system/config/repository/dashboards/' in Registry and grant all permissions to 'anonymous user' for gadgets folder.

ii. Add the gadget to gadget repository.
From 'Manage Gadget Server' menu access 'Gadget Repository'. Click 'Add New Gadget' link from there. You need to add the gadget's information there.
Gadget Name : Maps
Gadget URL : /registry/resource/_system/config/repository/dashboards/gadgets/maps.xml
You can add an image and description as you prefer.
iii. Make the gadget available by default
So now the gadget is added to the repository. We need to make it a default gadget.
Go to Gadget Repository and look for your maps gadget. Once you find it enable 'Make Default' and 'Show Gadget To Anonymous User' options.

Make Default -
Makes the gadget available to be added by any user who signs into gadget portal.
Show Gadget To Anonymous User -
Makes gadget available as a default gadget to non-signed in users.
5. Access the gadget from Gadgets' Portal
Now let's move to gadgets portal and use our gadget there.
i. Click on "View Portal' menu or directly accesss http://localhost:8080/portal
You could be automatically signed in as admin if you are in same browser session. Else click on 'Sign-in' link and sign in as admin (until u register a new user).
ii. Click on 'add tab' button on top of the portal window to add a new tab.
iii. Now let's our new gadget to this new tab. Click on 'Add Gadgets' button and it will open the gadget repository. Search for our 'maps' gadget and add it.
Return to the Dashboard and you'll see your gadgets!!!


No comments:
Post a Comment