Friday, June 17, 2011

Setting up WSO2 Stratos in personal machine

Here are the steps to setup Stratos in your personal machine.

1. Checkout the stratos setting-up script from here.
     https://svn.wso2.org/repos/wso2/trunk/carbon/build

2. Copy the wso2straos-manager-1.5.0, wso2stratos-is-1.5.0, wso2stratos-bam-1.5.0 distributions and the binary distributions of the services that you wish to include. i.e. wso2stratos-esb-1.5.0.
Lets mark this place where you copy these .zip files as PACKS_DIR.

3. Export following environment variables to your .bashrc
export PACKS_DIR="/home/yumani/Documents/packs/3.2.0"
export STRATOS_DIR="/home/yumani/Documents/Stratos/stratos320"
export STRATOS_VERSION=1.5.0
export SSO_ENABLED=true
export CREATE_DB=true

export STRATOS_MAIL_TRANSPORT='&lttransportsender class="org.apache.axis2.transport.mail.MailTransportSender" name="mailto"> &ltparameter name="mail.smtp.host"&gtcheetara.wso2.com</parameter>&ltparameter name="mail.smtp.port"&gt25</parameter> &ltparameter name="mail.smtp.starttls.enable"&gtfalse</parameter> &ltparameter name="mail.smtp.auth"&gtfalse</parameter>  &ltparameter name="mail.smtp.from"&gtcloud-noreply@wso2.com</parameter> </transportsender>'
export NOTIFICATION_EMAIL=xxxx@wso2.com
                                                                                                                                                                                     
4. Run stratos-setup.pl. (NOTE: Before this you may need to install 'liblist-moreutils-perl' to execute the perl script)

5. Then update your /etc/hosts file with following;
127.0.0.1 cloud-test.wso2.com
127.0.0.1 identity.cloud-test.wso2.com
127.0.0.1 governance.cloud-test.wso2.com
127.0.0.1 appserver.cloud-test.wso2.com
127.0.0.1 bam.cloud-test.wso2.com
127.0.0.1 dss.cloud-test.wso2.com
127.0.0.1 bps.cloud-test.wso2.com
127.0.0.1 brs.cloud-test.wso2.com
127.0.0.1 cep.cloud-test.wso2.com
127.0.0.1 esb.cloud-test.wso2.com
127.0.0.1 gadget.cloud-test.wso2.com
127.0.0.1 mb.cloud-test.wso2.com
127.0.0.1 mashup.cloud-test.wso2.com

6. After this you can start the servers. You will find that the setting-up script has unzipped all the binary distributions (you copied to PACKS_DIR) into the STRATOS_DIR location which, you specified in .bachrc.

7. Go to above CARBON_HOME.  You have two ways to start the cloud environment.
 i. Running the stratos.sh in STRAROS_DIR. Using stratos.sh you can start all the services and the manager at once or a selected set of services and the manager.
    i.e.
sh stratos.sh startall
sh stratos.sh wso2stratos-manager-1.5.0 wso2stratos-is-1.5.0 wso2stratos-bam-1.5.0

ii. Starting each service using its own startup scripts (CARBON_HOME/bin/wso2server.sh). This way you can first start the manager following wso2stratos-is and wsorstratos-bam. Then the other services as you wish.

That's all.. Now you can access wso2stratos-manager from browser and start using the cloud environment. URL for the stratos-manager can be gained from its startup logs which are printed on the back-end console.


Monday, December 13, 2010

Activity monitoring using WSO2 BAM Server

In this scenario we will be monitoring requests and responses passed through a proxy service in WSO2 ESB. The proxy service is calling an in/out operation in an Axis2Service in WSO2 WSAS.


Lets make the setup.

A) Deploy the axis2 service in WSO2 App Server.


1. Download WSO2 App Server-3.2.1 distribution from here and extract it.

In this setup we are going to have 3 WSO2 servers running at the same time. Therefore, we need to change the http/https ports of each server to make the servers start in different ports. To do this go to the CARBON_HOME/repository/conf and update the http/https ports in mgt-transports.xml and axis2.xml files.

2. Start WSO2 App Server distribution by running the startup scripts in WSAS_HOME/bin/.
$ sh wso2server.sh in Ubuntu and
$ wso2server.bat in Windows.

3. Once the server is started, Sign-in to admin console and go to Services >Add >Axis2Service and upload this service.


Now we have WSO2 WSAS waiting with a service in it at http://192.168.1.4:9764/wsas/services/Axis2Service?wsdl. Let's setup WSO2 ESB.


B) Configure WSO2 ESB

1. Download a WSO2 ESB-3.0.1 distribution from here and extract it. Change its ports and start the server as instructed above.

2. Once the server is started, Sign-in to admin console and go to Manage > Service Bus > Source View. Paste the following configuration into the source view.

<proxy name="DemoProxy1" transports="https http" startOnLoad="true" trace="disable" statistics="enable">
        <target>
            <endpoint name="endpoint_act">
                <address uri="http://192.168.1.4:9764/wsas/services/Axis2Service/" statistics="enable"/>
            </endpoint>
            <inSequence statistics="enable">
                <log>
                    <property name="IN" value="*********IN****************"/>
                </log>
            </inSequence>
        </target>
        <publishWSDL uri="http://192.168.1.4:9764/wsas/services/Axis2Service?wsdl"/>
    </proxy>

NOTE: You may need to chnage the endpoint epr according to your network settings.


C) Add publisher jars to ESB.

We need to enable Activity Publishing in ESB. Since ESB doesn't have activity publishing feature in it by default, we need to add the relevant jars manually.
So download following org.wso2.carbon.bam.data.publisher.activity.mediation-3.0.1.jar & org.wso2.carbon.bam.data.publisher.activity.mediation.ui-3.0.1.jar and copy to ESB_HOME/repository/components/dropins/ folder. This will add 'Activity Publishing' menu to ESB admin console under Configure menu.


Also we need to update the org.wso2.carbon.bam.data.publisher.activity.mediation-3.0.1.jar in ESB_HOME/repository/components/plugins with this patched version.

Lastly we need to enable message tracing in ESB. Open ESB_HOME/repository/conf/carbon.xml and add this;
<MediationStat>
    <MessageTracing>enabled</MessageTracing>
</MediationStat>


In the next step access ESB UI and enable message tracing. Sign-in to ESB admin console, navigate to 'Activity Publishing. In the 'Activity Publisher Configuration' page enable message tracing, go to Activity Publishing and enable eventing.
Message Threshold will be set to 2 by default. This is the minimum number of messages you need to have in the que before being read by a subscriber.
Enable 'Message Dumping' and 'Message Lookup'. Xpath expression is the value from which your message will be filtered for the subscriber.

After configurations on ESB side is done, we need to configure WSO2 BAM to monitor messages from and to ESB.


D) Configure BAM


1. Download WSO2 BAM-1.2.0 distribution from here and extract it. Change its ports and start the server as instructed above.

NOTE: BAM is configured to use H2 database by default. If you want to connect to oracle, mySql or an MS SQL db you need to create the database by running a script and update driverClassName,url, username, password in datasources.properties file which resides in BAM_HOME/repository/conf. Details of configuring to other DBMSs are explained here.

2. Now start WSO2 BAM server and sign-in to the admin console.

3. Navigate to Configure > Monitored Servers > Add Servers.

4. Add the server information of your ESB server, which we are going to monitor. Since we are monitoring mediation, our data collection method should be 'eventing' and type of data thats traced will be 'message'. So the coonfiguration is:

Server URL : https://<server IP>:<server port>
Data Collection method : Eventing
Type of data : Messagega
User Name : user name for ESB
Password : Password for ESB


After this you will have an entry in the 'Monitored Servers' with the information you gave above.


E) Monitor the messages

1. Using a client send messages to the proxy service we created above. i am using following java client.


/*
*Copyright (c) 2005-2010, WSO2 Inc. (http://www.wso2.org) All Rights Reserved.
*
*WSO2 Inc. licenses this file to you under the Apache License,
*Version 2.0 (the "License"); you may not use this file except
*in compliance with the License.
*You may obtain a copy of the License at
*
*http://www.apache.org/licenses/LICENSE-2.0
*
*Unless required by applicable law or agreed to in writing,
*software distributed under the License is distributed on an
*"AS IS" BASIS, WITHOUT WARRANTIES OR CONDITIONS OF ANY
*KIND, either express or implied.  See the License for the
*specific language governing permissions and limitations
*under the License.
*/

package org.wso2.carbon.test;

import org.apache.axiom.om.OMAbstractFactory;
import org.apache.axiom.om.OMElement;
import org.apache.axiom.om.OMFactory;
import org.apache.axiom.om.OMNamespace;
import org.apache.axis2.AxisFault;
import org.apache.axis2.Constants;
import org.apache.axis2.addressing.EndpointReference;
import org.apache.axis2.client.Options;
import org.apache.axis2.client.ServiceClient;
import org.apache.axis2.transport.http.HTTPConstants;
import org.apache.commons.httpclient.HttpClient;
import org.apache.commons.httpclient.MultiThreadedHttpConnectionManager;

import javax.xml.namespace.QName;

public class EsbDemoProxy {

    private static EndpointReference targetEPR = new EndpointReference(
            "http://10.100.1.120:8280/bam/services/DemoProxy1");

    public static OMElement echoPayload(String x) {
        OMFactory fac = OMAbstractFactory.getOMFactory();
        OMNamespace omNs = fac.createOMNamespace("http://service.carbon.wso2.org", "example");
        OMElement method = fac.createOMElement("echoInt", omNs);
        OMElement value = fac.createOMElement("x", omNs);
        value.addChild(fac.createOMText(value, x));
        method.addChild(value);
        return method;
    }


    public static void main(String[] args) throws AxisFault {

        // creates a new connection manager and a http client object
        MultiThreadedHttpConnectionManager httpConnectionManager = new MultiThreadedHttpConnectionManager();
        HttpClient httpClient = new HttpClient(httpConnectionManager);
        for (int a = 0; a < 1; a++) {
            for (int i = 0; i < 1; i++) {
                ServiceClient sender = new ServiceClient();
                try {
                    OMElement payload1 = EsbDemoProxy.echoPayload("55");
                    Options options = new Options();
                    options.setTo(targetEPR);
                    options.setTransportInProtocol(Constants.TRANSPORT_HTTP);

                    OMFactory omFactory = OMAbstractFactory.getOMFactory();
                    OMElement omElement = omFactory.createOMElement(new QName("http://wso2.org/ns/2010/10/bam", "BAMEvent", "ns"), null);
                    omElement.addAttribute("activityID", "AAAAIsiasd-sdswodi-2329", null);

                    OMElement bampropertyElement = omFactory.createOMElement(new QName("http://wso2.org/ns/2010/10/bam", "Property", "ns"), null);
                    bampropertyElement.addAttribute("name", "ESB2_a", null);
                    bampropertyElement.addAttribute("value", "A", null);

                    omElement.addChild(bampropertyElement);
                    omElement.addChild(omElement);

                    sender.addHeader(omElement);

                    sender.setOptions(options);
                    OMElement result1 = sender.sendReceive(payload1);
                    String response1 = result1.getFirstElement().getText();
                    System.out.println(response1);

                } catch (Exception e) { // (XMLStreamException e) {
                    System.out.println(e.toString());
                }
                finally {
                    if (sender != null) {
                        try {
                            sender.cleanupTransport();
                        } catch (Exception e) {
                            e.printStackTrace();
                        }

                        try {
                            sender.cleanup();
                        } catch (Exception e) {
                            e.printStackTrace();
                        }
                    }
                }

                httpConnectionManager.closeIdleConnections(0);
                httpConnectionManager.shutdown();
            }
        }
    }
}


2. After sending few messages you will be able to observe the messages from the BAM Admin Console > Main Dashboard > Actvity Tab

Configuring WSO2 BAM to connect to different Databases

Connecting to mySql database.

1. You need to execute the mysql.sql in BAM_HOME/dbscripts folder.

- Navigate to where you have the above script.
- Login to MySQL as the root user.
mysql -u root -p
- give the password at the prompt

- Execute the mysql.sql script.
source mysql.sql


This will create the BAM database. To connect to the database you need to:

2. Copy the mysql driver to CARBON.
- Navigate to BAM_HOME/repository/components/lib and copy mysql-connector-java-5.1.7-bin.jar.

3. Update BAM_HOME/repository/conf/datasources.properties with your database information. A sample is done below.
synapse.datasources=bamMySQL
synapse.datasources.icFactory=com.sun.jndi.rmi.registry.RegistryContextFactory
synapse.datasources.providerPort=2199
synapse.datasources.bamh2.registry=JNDI
synapse.datasources.bamh2.type=BasicDataSource
synapse.datasources.bamh2.driverClassName=com.mysql.jdbc.Driver
synapse.datasources.bamh2.url=jdbc:mysql://localhost:3306/wso2bam_db
synapse.datasources.bamh2.username=wso2bam
synapse.datasources.bamh2.password=wso2bam‎
synapse.datasources.bamh2.dsName=bam_datasource
synapse.datasources.bamh2.maxActive=100
synapse.datasources.bamh2.maxIdle=20
synapse.datasources.bamh2.maxWait=10000

Connecting to Oracle database

1. You need to execute the oracle.sql in BAM_HOME/dbscripts folder.

- Login to SQLPlus as a sysdba and create the db user and grant required access.
$sqlplus sys as sysdba; 

SQL> startup
drop user wso2bam‎ cascade; 
Create user wso2bam‎ identified by wso2bam account unlock; 
grant connect to wso2bam; 
grant create session, dba to wso2bam;
commit;

Now login from the above created user and execute the oracle.sql script

sqlplus wso2bam/wso2bam@10.100.1.10/ORCL
SQL>>@/dbscripts/bam/bam_schema_oracle.sql;

This will create the BAM database. To connect to the database you need to:

2. Copy the mysql driver to CARBON.
- Navigate to BAM_HOME/repository/components/lib and copy ojdbc14.jar.

3. Update BAM_HOME/repository/conf/datasources.properties with your database information. A sample is done below.
synapse.datasources=bamOracle
synapse.datasources.icFactory=com.sun.jndi.rmi.registry.RegistryContextFactory
synapse.datasources.providerPort=2199
synapse.datasources.bamh2.registry=JNDI
synapse.datasources.bamh2.type=BasicDataSource
synapse.datasources.bamh2.driverClassName=oracle.jdbc.driver.OracleDriver
synapse.datasources.bamh2.url=jdbc:oracle:thin:@localhost:1521/wso2bam_db
synapse.datasources.bamh2.username=wso2bam
synapse.datasources.bamh2.password=wso2bam
synapse.datasources.bamh2.dsName=bam_datasource
synapse.datasources.bamh2.maxActive=100
synapse.datasources.bamh2.maxIdle=20
synapse.datasources.bamh2.maxWait=10000

Tuesday, November 9, 2010

Setting-up phpMyAdmin to administer MySQL databases from a web console.

In unix environment we usually use mysql command prompt to work with mySQL databases. Sometimes its hard to view large data tables from this manner. phpMyAdmin comes handy in this.

Below are the simple steps how you could setup it in Ubuntu.

1. Do an apt-get install to phpmyadmin

sudo apt-get install phpmyadmin

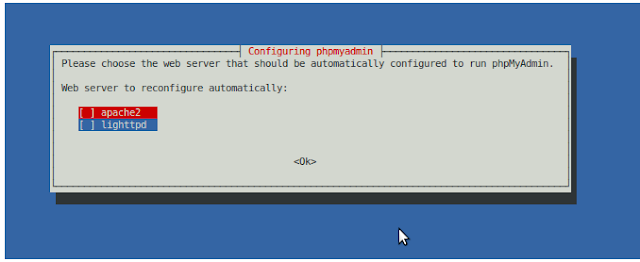
2. During the installation process it'll configure a web server and a database to run phpMyAdmin.


3. As final steps give user name and password to access the web console.

4. After the installation you can access phpMyAdmin via web console via http://localhost/phpmyadmin


5. Inside the admin console you may find all available mySQL databases listed in the top left corner of the window. Simply click on the required database to access it.


6. You can then browse, query, track, drop tables\data, import\export data using this console.


Tuesday, November 2, 2010

Creating a gadget for WSO2 Gadget Server using Carbon Studio

I've converted my last post on WSO2 Carbon Studio and Gadget Server, to a tutorial with more description added.

It is published in WSO2 Oxygen tank - Library as "Creating a gadget for WSO2 Gadget Server using Carbon Studio"

Wednesday, October 13, 2010

Adding a gadget to WSO2 Gadget Server using cApp

In previous posts I've explained how to install WSO2 cApp into eclipse  and how to start creating a WSO2 product artefact.

So as I promised in the earlier posts, here is how you create an artefact. In this post I will explain how to create a gadget which can be deployed in WSO2 Gadget Server and viewed from Gadgets' portal.

1. Create a cApp project as in here.

2. Create a gadget artefact.
Click on 'Create New artefact' button in root-artifact.xml in your cApp project and Select "Gadget" OR Right click on the cApp project you created and Select "Gadget". You will get 'New Gadget" creation wizard.

At the 'Name' prompt, give your gadget artifact a name and proceed.


In the next screen, specify a name for the folder containing you gadget specific artifacts and finish the wizard.

NOTE: The project that you will be creating the artifact in will appear selected in this window. If you want you can change it here.

So after this initial step you should have your project structure like this:

3. Develope the gadget code.
WSO2 cApp loads open social development environment (OSDE) in Eclipse. This is one of the plugins that is getting installed with cApp. So if you double click on your .xml file (maps.xml in my case) you will have the OSDE opened up on the right side of the IDE.

Now lets fill in the gadget code. The code that I am going to put in is a sample taken from googles gadget docs (http://code.google.com/apis/gadgets/docs/fundamentals.html#location).

In the proceeding steps I will show you how easy it is to create and deploy this using cApps.

<?xml version="1.0" encoding="UTF-8" ?>
<Module>
  <ModulePrefs title="Map of __UP_loc__" height="300" 
    author="Jane Smith" 
    author_email="xxx@google.com" /> 
  <UserPref name="loc" 
    display_name="Location" 
    required="true" />
  <Content type="html">
  <![CDATA[ 
    <script src="http://maps.google.com/maps?file=js" type="text/javascript"></script>
    <div id="map" style="width: 100%; height: 100%;"></div>
    <script type="text/javascript">
    var prefs = new gadgets.Prefs();
    var map = new GMap(document.getElementById("map"));
    map.addControl(new GSmallMapControl());
    map.addControl(new GMapTypeControl());
    var geocoder = new GClientGeocoder();
    geocoder.getLatLng(prefs.getString('loc'), showMap)

    function showMap(point) {
      if (point!=null) {
        map.centerAndZoom(point, 6);
      }
    };    
    </script>
  ]]> 
  </Content>
</Module>

And it is as simple as filling the tabs that you find at the bottom your IDE (see the image below).


ModulePrefs such as title, author, author_email can be filled in Basic tab - 'Attributes' section, fetures can be put in 'Features' section of the same.

I have a UserPref, 'loc' in my gadget which I created in 'UserPref' tab and yes I made it a required parameter. Since it doesn't have a default value I kept that option empty and I stick to default 'String' data type.

Then in the 'Content tab', I added my content. Click 'Add' button in 'Content' tab and say its an 'html' content (as you see in above code it is Content type="html"), and  since I go by default view I can leave 'view' type empty.

After you do that, you will have an entry created for the view that you added just now and now you need to fill in the 'Content' to it. So fill in 'Content'; This includes all things you put within CDATA tags.

NOTE: You DON'T need to type in <![CDATA[ section, as OSDE prints it by itself. And nore you cannot have <html>, <head>, or <body> tags as having them violate the gadget rules.

That's it! now if you navigate to 'Source' tab, you will see you gadget's code there with complete, correct syntax and perfect alignments.


4. Add the gadget to server's gadget repository.
You need to have a WSO2 Gadget Server binary distribution with you. Download it from here, extract and you are ready.

While in J2EE perspective in eclipse, go to Server area and add a WSO2 Gadget Server as described here. This will let you start the server from within eclipse.

After you started the server; Login to Gadget Server admin console and navigate to '/_system/config/repository/dashboards/gadgets' folder in internal registry. You will see the gadget that was deployed from cApp in here.


You can view and edit your gadget code from here.


Now that we saw the gadget having deployed in the Server from cApp, we have to follow two more steps to make it available in Gadgets' portal where it is actually used.

i. Grant anonymous user permission to the gadget.
For this navigate to '/_system/config/repository/dashboards/' in Registry and grant all permissions to 'anonymous user' for gadgets folder.


ii. Add the gadget to gadget repository.
From 'Manage Gadget Server' menu access 'Gadget Repository'. Click 'Add New Gadget' link from there. You need to add the gadget's information there.
  Gadget Name : Maps
  Gadget URL  : /registry/resource/_system/config/repository/dashboards/gadgets/maps.xml
You can add an image and description as you prefer.

iii. Make the gadget available by default
So now the gadget is added to the repository. We need to make it a default gadget.
Go to Gadget Repository and look for your maps gadget. Once you find it enable 'Make Default' and 'Show Gadget To Anonymous User' options.


Make Default -
Makes the gadget available to be added by any user who signs into gadget portal.

Show Gadget To Anonymous User -
Makes gadget available as a default gadget to non-signed in users.


5. Access the gadget from Gadgets' Portal
Now let's move to gadgets portal and use our gadget there.

i. Click on "View Portal' menu or directly accesss http://localhost:8080/portal
You could be automatically signed in as admin if you are in same browser session. Else click on 'Sign-in' link and sign in as admin (until u register a new user).

ii. Click on 'add tab' button on top of the portal window to add a new tab.

iii. Now let's our new gadget to this new tab. Click on 'Add Gadgets' button and it will open the gadget repository. Search for our 'maps' gadget and add it.

Return to the Dashboard and you'll see your gadgets!!!

Tuesday, October 12, 2010

How to add a WSO2 Carbon server to cApps

You can add WSO2 Carbon Servers to Carbon Studio and deploy, undeploy artefacts created from cApp. This is how you do it.

1. You need to have a binary distribution of a WSO2 Carbon Server with you. For this post I will be using WSO2 Gadget Server. Download it from here and extract.

2. Install Carbon Studio in you eclipse IDE as described in here.

3. In the 'Server view', right click and Select New > Server and the "New Server" wizard will appear.

4. Scroll down in the servers types until and you'll see 'WSO2' at the very bottom. Expand this and there'll be two server types. 
   i. WSO2 Carbon 3.0.1 based Server
  ii. WSO2 Carbon 3.1 based Servers
Select the server type based on the binary you had extracted in step 1 above. I will be using 'WSO2 Carbon 3.0.1 based Server' which matches the distro I downloaded in step 1.

5. After selecting the server type, you can change the 'Server's host name', 'Server Name' if you want or can leave with defaults.

6. Then we need to set the 'Server runtime environment'. Click on the 'Add..' link next to 'Server runtime environment' field and it will open up a window for you to select the runtime.

In this, browse for you Carbon Home, that is you need to browse for the location where you extracted the Carbon Server distribution. Press 'Finish' and return to parent window.

7. In the parent window proced to the next step, where its asking you to set the ports for your server. You can accespt defeault ot change as you wish. In my case I am changing first two ports as the Gadget Server runs on 8080/8443 by default.

You also can enable options such as;
  i. Bring up the carbon home in the browser when this server starts -
Will launch server's admin console in you browser, after ther server is started via cApp.

 ii. Enable hot update of published server modules -
Hot update feature will be enabled where all changes you do to your deplyed modules will be updated then and there (without you restarting the server).

iii.Enable osgi console -
osgi prompt will appear at the server startup and you will be able run osgi commands on the start-up console.


8. In the next step it will give you a panel where you can add\remove applications to your server. For the time being let's not add applications now and we'll only start the server. So press 'Finish'.


9. Now you'll find your server appearing in the 'Server view'. Right click on it and select start from the menu. And the server will be gracefully started !!!.
Enhanced by Zemanta

Tuesday, September 28, 2010

Gadgets - Lesson 2

In the last lesson we introduced ModulePrefs as one of the main elements in a gadget. We also said it carries the gadget's characteristics such as its title, author, description etc.

The sample gadget source below shows how these attributes should appear within ModulePrefs.

<?xml version="1.0" encoding="UTF-8"?>
<Module>
 <ModulePrefs title="This is lession2" height="250" scaling="false" author="yumani">
  <locale lang="en" country="us"/>
  <locale lang="ja" country="jp"/>
 </ModulePrefs>
 
 <Content type="html">
  <![CDATA
   Hello, World!
   ]]
 </Content>
</Module>

ModulePrefs is also a container for features, metadata and processing rules. <locale> is one such elements. This is used to incorporate the internationalization feature to the gadget. It is a nested element within <ModulePrefs>. You can see how it is used in the above code segment.

Gadgets - Lesson 1

What is a gadget?

Whats ia a gadget, here are definitions from wikipedia and igoogle (as of 28 Sep, 10).

wikipedia:
In the software industry, "gadget" refers to computer programs that provide services without needing an independent application to be launched for each one, but instead run in an environment that manages multiple gadgets. There are several implementations based on existing software development techniques, like JavaScript, form input, and various image formats. (wikipedia, 27,Sep 2010)

igoogle:
Gadgets are simple HTML and JavaScript applications that can be embedded in webpages and other apps (http://code.google.com/apis/gadgets/).

So as it says from above a gadget is an application which is simple, and allows to put HTML/javascript code, and can be embedded in multiple web applications and viewed by many.

In this post and few other posts following, I will be writing about different elements of gadgets. And here goes the first!!!

Let's start with basics
This is a basic Gadget. This shows the basic ingredients of a gadget - Module, Module Prefs, Content.
<?xml version="1.0" encoding="UTF-8" ?> 


     <![CDATA[ 
       Hello, world!
     ]]>
   

</xml>

Module
Denotes that it is a gadget. So you need to keep all your gadget source within tags.

ModulePrefs
Holds the information about the gadget. This can include title of the gadget, description, hight, title_url, author, author_email, screen_shot, thumbnail.

Content
Says to which content type gadget belongs to; it can be "html" or "url". Means this can hold the HTML code or a link to an external content. tag contains the real work of a gadget. It gives the programming logic and the HTML code for appearance.

Other than above we also have;
<?xml >
This line is to indicate the gadget code is of XML document type. The standard XML declaration we use for gadgets is <?xml version="1.0" encoding="UTF-8" ?>. Means it supports xml 1.0 specification and unicode encoding type of UTF-8.

<![CDATA[
Indicates the data within these tags should not be passed by the XML parser. Hence all you HTML\jvascript code related to the gadgets appearance and programming logic should go here.

Monday, September 13, 2010

Single Sign-On & Single Sign-Out - user experience

Single sign-on is "a session/user authentication process that permits a user to enter one name and password in order to access multiple applications. The process authenticates the user for all the applications they have been given rights to and eliminates further prompts when they switch applications during a particular session." - Definition from Whatis.com

In Single sign-out the user will be signed-out from all authenticated applications at a single sign-out


WSO2 Stratos demonstrates the SSO concept very well. This is how user SSO experience in WSO2 Stratos.

Firstly, you need to create a domain and register you tenant in Stratos. There'll be two follow up emails. One to confirm you email address and the other to give your account details.
Following up the mails you can login to you Startos Manager page, or you can simply sign-in using the given admin credentials.

The first page you see after sign-in from admin credentials is the Stratos Manager Home page. From here you can invoke various WSO2 products which appear as services.
With SSO enabled Stratos, you can access these services without having to re-login at each entrance point (at each point where it opens up a new service for you). It is because your username and password are already authenticated and you are permited to access these multiple applications.

Afterwards, Say you have opened sevaral services where you were automatically logged-in and while you were working on one service (e.g. Cloud Gadgets), another has gone on a session expriration. No issues :), When you accessing the page it will nicely validate you by itself and make the service availble in a refreshed session.

Now, if you signout from one of the software services by clicking the 'Sign-out' link, you will be automatically signed-out from all the accessed services. That's where you will notice that Single -sign-out is in place!!!

Wednesday, September 1, 2010

Creating a WSO2 artifact using Eclipse

As was shown in my previous article, we have a plugin which can be added to eclipse which will open you a development environment to create artefacts used in WSO2 products. Now lets see how we can create WSO2 product artefacts in this environment.

So to start off with, you need to have eclipse IDE, (preferably, eclipse-jee-galileo) and install WSO2 cApp following the steps in here.

After WSO2 cApp is installed and the IDE is restarted, do following;

1. Create a WSO2 project
Go to File > New > Project. This will open up the 'New Project' wizard.
You have two menu options for this:
  • You can either select 'Carbon Application Project' option that appear at the beginning of the list.
  • Or you can select 'WSO2' at the bottom, which will also give 'Carbon Application Project' when you expand it.

In the next step, give your project a name and 'finish' the wizard.

Now you'll have a project created (with the name you gave) in the 'Project Explore'. Expand the project folder and you'll find its initial content as shown below;
  • JRE System library - Jars from your java runtime
  • java-src -the place where you keep the java src files
  • Artifacts - you will have this empty when you start. Later when you create an artifact, it will appear inside this.
  • root-artifact.xml - Is the place which manages you project
  • Server Roles - Server roles that you can specify for each of your artefact.

2. Create an artifact
Double click on root-artifact.xml. Click on 'Create New Artifact' button. You will get a drop down menu, which will have all WSO2 artifacts that are supported up to now.

From the menu simply select the artifact you need to create.

I will explain how to create few ESB artefacts in my next posts.
Enhanced by Zemanta

Friday, July 16, 2010

How to install WSO2 cApp in eclipse

Am using eclipse-jee-galileo-linux-gtk.tar.gz for this. and a milestone release of WSO2 cApp plugin, which can be downloaded from here.

1. Firstly extract you eclipse distribution and launch it.

2. Then Go to Help menu and select "Install Software"


3. Click on the 'Add' button at the top corner of the 'Install' DBox to add the location where the software resides.


4. In the 'Add site' DBox, click on 'Archive' button and navigate to the location where you downloaded WSO2 cApp plugin (wso2-eclipse-ide-tools-1.0.0.M11.zip).

5. When the achive is added, all the software available in it will appear in the small text area below it.
Remember : You need to have "group items by category" checkbox unchecked.


4. Out of the above list, select "WSO2 Carbon Studio Feature" and press Next to proceed and move on until completion.

That's it. Now you have WSO2 cApp integrated to eclipse IDE.

Featured

Selenium - Page Object Model and Action Methods

  How we change this code to PageObjectModel and action classes. 1 2 3 driver . findElement ( By . id ( "userEmail" )). sendKeys (...

Popular Posts