Monday, December 12, 2022

Selenium - Configure TestNG to your Selenium framework.

To enable TestNG features in out test framework, as the first step we need to load the TestNG libraries to our test development environment(Eclipse).
  • Go to mvnreposotory.com and type in "testng"in the search bar. 
  • In the search results, select the latest available for dependency version. At the time of writing this blog I got below 7.6.1 version. 
  • Copy maven syntax for the dependency, so that we can paste it to our pom.xml. 
  • Once copied append it to the pom.xml of your maven project (which the framework was being built.
  • Accordingly I added below to my pom.xml.
<!-- https://mvnrepository.com/artifact/org.testng/testng -->
<dependency>
    <groupId>org.testng</groupId>
    <artifactId>testng</artifactId>
    <version>7.6.1</version>
    <scope>test</scope>
</dependency>

Also we need to install the testNG plugin to the IDE. Go to Help >> Eclipse Market Place >> search for "TestNG"
Select to install the plugin and you are good.

Thursday, December 1, 2022

TestNG - files structure

Structure of the TesNG.xml file consists elements as below.

<suite>
    <test name = "">
         <classes>
            <class name="" />
         <classes>
    </test>
    <test name = "">
        <classes>
            <class name="" />
        <classes>
     </test>
</suite>
  • Each testNG xml pockets its content within the parent <suite> tags.
  • test tags is the next main level and you can have many test tags. These specify the module.
  • classes comes next. This helps goup the many classes you have under a certain test module
  • class is the smallest element which carries the class name.
Example of a sample TestNG is as below;
 
<?xml version="1.0" encoding="UTF-8"?>
<!DOCTYPE suite SYSTEM "http://testng.org/testng-1.0.dtd">
<suite parallel="tests" name="ShoppingCart">

  <test thread-count ="5" name="Submit Order Tests">
    <classes>
      <class name="learningspace.tests.SubmitOrderTest"/>
    </classes>
  </test>
  
  <test thread-count ="5" name="Error Validation Tests">
    <classes>
      <class name="learningspace.tests.ErrorValidationTests"/>
    </classes>
  </test>
  
</suite>

Sunday, November 20, 2022

Beginners spot - Pushing your work to GitHub


1. Login to your GitHub account and create the repo

2. Go to command prompt;

git config --global user.name "yumani"

git config --global user.email "yumani@gmail.com"

3. Navigate to the location of the local repo and use the below commands. 

It will initialize the repo, add the files and push to the origin with the comments.

git init

git add *

git status

git commit -m "Adding the initial file set"

git remote add origin https://github.com/yumaniranaweera/snuggery.git

git push origin master

4. You can import the files structure to your Eclipse editor from "File >> Import>>


Tuesday, November 15, 2022

Beginners Spot - Setup Maven in Test Automation environment

1)  Install Maven  (Windows)

  - Download from maven website and unzip the file.

  - Set MAVEN_HOME -  <base dire>\apache-maven-3.8.6

  - Add to path -  <base dire>\apache-maven-3.8.6\bin

2) Test the installation

 - Open cmd and type mvn --version

 - Should return maven home, version etc.

3) Create a maven project in Eclipse ( You can use maven-quickstart-archetype)

4) Integrate to Eclipse

 - Apply Maven Surefire plugin to Eclipse.

 -  Go to Maven Surefire plugin page >Usage (https://maven.apache.org/surefire/maven-surefire-plugin/usage.html)

 - Copy the plugin management snippet and paste in the pom.xml in your eclipse project.

  1. <build>
  2. <pluginManagement>
  3. <plugins>
  4. <plugin>
  5. <groupId>org.apache.maven.plugins</groupId>
  6. <artifactId>maven-surefire-plugin</artifactId>
  7. <version>3.0.0-M7</version>
  8. </plugin>
  9. </plugins>
  10. </pluginManagement>
  11. </build>

Paste this above your dependencies section in the pom.xml.

 - now you can run mvn clean, mvn test commands.

5) Integrate TestNG

 - We need to add an additional configuration to the plugins section in the pom.xml

 - Go to https://maven.apache.org/surefire/maven-surefire-plugin/examples/testng.html

  1. <configuration>
  2. <suiteXmlFiles>
  3. <suiteXmlFile>testng.xml</suiteXmlFile>
  4. </suiteXmlFiles>
  5. </configuration>

- Also you need to add the TestNG dependency to the pom.xml, if its not already added.


Saturday, November 12, 2022

Selenium - Explicit wait

 This post is not about explicit wait concept in Selenium. But about how we could convert standard explicit wait command to an action method.

So our standard command set is like this:

	WebDriverWait wait = new WebDriverWait(driver,Duration.ofSeconds(5));
	wait.until(ExpectedConditions.visibilityOfAllElementsLocatedBy(By.cssSelector(".mb-3")));

Lets make the action class;

public void waitExplicity(By findBy) {
	WebDriverWait wait = new WebDriverWait(driver, Duration.ofSeconds(5));
	wait.until(ExpectedConditions.visibilityOfAllElementsLocatedBy(findBy));																									
}

This is a reusable method and therefore we should maintain it within the Abstract Components of our test framework.

(btw, hope you noticed the By locator being sent into wait.until as a parameter. The child class which will be extending the AbstractComponent class should set the value for this.)

Selenium - POM and Action Methods - 2

 Lets check how the below segment can be changed to page object model.

1
2
3
4
5
6
List<WebElement> products = driver.findElements(By.cssSelector(".mb-3"));	

WebElement prod =products.stream().filter(product->
product.findElement(By.cssSelector("b")).getText().equals(productName)).findFirst().orElse(null);

prod.findElement(By.xpath("//div[@class='card-body']/button[2]")).click();

Lets take the web element descriptions first; Here we are locating a products list (findElements by the classname csslocator). Since its a list we make it of the type List<WebElement> (line 1). This is how it is done by using @FindBy (we discussed in part 1)

@FindBy(css = ".mb-3")
List<WebElement> products;

Afterwards we can do an action class to findElements. I have called a wait method from the abstract components. You can ignore that for the moment. -- let's not distract ourselves with that in this post peepsies ..

public List<WebElement> getProductList(){
	waitExplicity(productBy);
	return products;
}

Next (line 3-4) we go through the list and filter the product which matches the product name that we specify through a String. This is how it is converted to an action method.

public WebElement getProductByName(String productName){
	WebElement prod =getProductList().stream().filter(product->
	product.findElement(By.cssSelector("b")).getText().equals(productName)).findFirst().orElse(null);
	return prod;
}

Let me add bit of details here; If you look at the line 3 of our first code snippet, the stream filter results are assigned to a variable called prod. How is the prod extracted? By traversing though the products, which is the list of products. With me? ook one step ahead-

How do we get the products from our POM & Action Methos approach? via the getProductList action method. 

So that's what we have done above. We have getProductList().stream().filter .... instead previous products.stream().filter ....

Now next is the fun part! See what we do when we do addToCart.

public void addToCart(String productName){
		WebElement chosenProduct = getProductByName(productName);
		chosenProduct.findElement(addtoCartBtn).click();
}

We use getProductByName(productName) and assign the returning WebElement to 'chosenProduct' variable.  same concept as above. The list web element is replaced by the action method that we created to get the list webelement.

In the next line we do a findElement from within the chosenProduct context, not driver context (noticed!) This is not POM struff. Its about how Selenium facilitate different locator contexts.

However, we cannot use the elements defined in POM to other context. Only driver context could use them. So we have to use the long By.locator methods or we could defined them separately and use here. See.. notice the line 1 below.

By addtoCartBtn = By.xpath("//div[@class='card-body']/button[2]");

public void addToCart(String productName){
	WebElement chosenProduct = getProductByName(productName);
	chosenProduct.findElement(addtoCartBtn).click(); //You cannot use Page objects when you are using a WebElement context
}

So that's about what I learnt on this.. See below for the connected code.

 1
 2
 3
 4
 5
 6
 7
 8
 9
10
11
12
13
14
15
16
17
18
19
20
21
22
23
        @FindBy(css = ".mb-3")
	List<WebElement> products;

	//WebElements defined under By type to be used in WebElement context. 
	//You can use POs only in driver context
	By productBy = By.cssSelector(".mb-3");
	By addtoCartBtn = By.xpath("//div[@class='card-body']/button[2]");
	
	public List<WebElement> getProductList(){
		waitExplicity(productBy);
		return products;
	}
	
	public WebElement getProductByName(String productName){
		WebElement prod =getProductList().stream().filter(product->
		product.findElement(By.cssSelector("b")).getText().equals(productName)).findFirst().orElse(null);
		return prod;
	}
	
	public void addToCart(String productName){
		WebElement chosenProduct = getProductByName(productName);
		chosenProduct.findElement(addtoCartBtn).click();
	}


Selenium - Page Object Model and Action Methods


How we change this code to PageObjectModel and action classes.

1
2
3
driver.findElement(By.id("userEmail")).sendKeys("testA1@gmail.com");
driver.findElement(By.id("userPassword")).sendKeys("testA1#");
driver.findElement(By.id("login")).click();

Page Objects

We can convert the locators  to Page Objects this way

/*	Page Objects Model*/
	@FindBy(id="userEmail")
	WebElement useremail;
		
	@FindBy(id="userPassword")
	WebElement userpass;
		
	@FindBy (id="login")
	WebElement login;

How do we do it

1- Use @FindBy from org.openqa.selenium.By in Selenium. Consider this is replacing "driver.findElement(By" in our standard way of locating elements. 

2- Next put the locator type; id, css, xpath, classname etc

3- Add the relative value next to the locator type. For an example, if you choose 'id' as the locator type, you should get the 'id' of the element. In my case the id of the element that I chose is 'userEmail'. So I build my line like this; @FindBy(id="userEmail")

4- That's not all; We need to let Selenium know what the web element is. So add this.

WebElement <element>. In my case WebElement username;

5- So it makes up our page objects this way;

@FindBy(id="userEmail")

WebElement userName;


Action Classes

As action we input username, pass and press login button. I will show you how these can be segmented out to an action class;

public void Login(String email, String pass){
	useremail.sendKeys(email);
	userpass.sendKeys(pass);
	login.click();
}

I think you can easily see how we have used each of the above page objects to action.

eeasy ha !! wait for more cool stuffs peeps :)


Friday, November 4, 2022

Selenium - Composite Actions

Amazing piece that I learnt today; Composite actions. Its a concept in which you carry several action commands within one line of Selenium code.

For an example, un the below syntax I perform these actions;

move to the search bar, press it, hold down shift key and enter a text and then double-clicking on the text.

So how is it done. 

We have used the "Actions" class within org.openqa.selenium.interactions.Actions.

Actions a = new Actions(driver);
WebElement caps = driver.findElement(By.xpath("//input[@id=\"twotabsearchtextbox\"]"));
a.moveToElement(caps).clickAndHold().keyDown(Keys.SHIFT).sendKeys("iphoneX").doubleClick().build().perform()

It supports many actions such as below 

clickAndHold().

keyDown(Keys).

sendKeys("iphoneX")

doubleClick()

Once you have selected the action classes required for your test, in Selenium Java you need to end the command with .build().perform(); 

Complete code is as below;

Selenium - Xpath Locators

1. By Tagname
 //tagname[@attribute='value'] 
driver.findElement(By.xpath("//input[@placeholder='Name']")) 

2. By index of the attribute 
 //tagname[@attribute='value'][index] 
 driver.findElement(By.xpath("//input[@type='text'][2]")) 
Used when your attribute and the value are same for multiple elements 

3. By tagnames when there are many instances of the childtag. 
 //parenttag/childtag[index]) 
driver.findElement(By.xpath("//form/input[3]")) 
Use index when there are many instances of child tag and you have to locate one of them.) 

 4. By parent to child-tag 
//parenttag[@attribute='value']/childtag[index]) 
driver.findElement(By.xpath(" //div[@class='forgot-pwd-btn-conainer']/button[1]")) 

 5. With regular expression 
 //tagname[contains(@class,'value')] driver.findElement(By.xpath("//button[contains(@class,'submit')]"))

Monday, June 13, 2022

Revisiting ESB

Messaging Architecture


High-level Architecture


Back in WSO2 ..❤️

It's been more than 5 years since I've last blogged here! Also, that's almost the same length of time that I was away. Away from WSO2.

During the last 5+ years I was working for an organization in the telecommunication domain. With them, I joined to head the Production support to WSO2 based product platform they had and then gradually picked up, Delivery, Product management and finally headed a product department. Not only that I was moved across 3 company logos within the same group!! I guess it explains the dynamics. Entirely a roller-coaster ride which was made okay by certain lead levels and dear teams I engaged with during the journey.

This June, I joined WSO2 again. Much thankful to Sanjiva, Customer Success leadership for accepting me. 

Today's post is all to say how grateful it feels to join again. 


Onboarding program at WSO2 simply re-confirms how well you would be looked after.

Initial interfacing by the HR teams to collect my data, personalized couriering of the brand new Apple MacBook Pro and broad welcome greet followed by the amazing onboarding orientation. There was so much attention by WSO2 to all the details. Things like EPF form was sent home with an ink pad and filled form to be collected by the company arranged currier.  Comprehensive hands-on session with digi-ops to set up the laptop, mail, apps, etc, so you can operate as everyone else from the day 1 itself! Each of the department joined the induction program to tell new employees about what they do how we can engage. I am sure each batch must be feeling very special and totally ready by the time they are through this program.

Induction hands you over to your lead who discusses their planned programs with necessary buddy support etc.

Yeap.. That was my first 4 days after re-joining! 

Looking forward to serve at my best and enjoy every min of it!


Saturday, June 27, 2015

Patch Management System - developed, maintained, enhanced using WSO2 Carbon products

WSo2 support patching in brief

WSO2 support system issues patches to fix defects that are found in product setups. This patching procedure needs to be methodically handled as the fix that you are applying should correctly solve the issue, it should not introduce regression, it should be committed to relevant public code base, it should be committed to support environment and validated that it correctly fit in with existing code base.

Patch Management Tool (PMT)

In an environment where you have large customer base and expects many clarifications daily, there are chances of developers missing certain best practices. Therefore a process that forces and reminds you of what need to be done while the process should be embedded to the system. WSO2 Patch Management Tool, PMT was built for above purpose.

In the above process, we also need to maintain a database of patch information. In WSO2 support system, applying a patch to a server involves a method which ensures that a new fix is correctly applied to the product binaries. This patch applying procedure mainly relies on a numbering system. This means every patch has its own number. Since we support maintenance for many platform versions at the same time, there are parallel numbering systems for each WSO2 Carbon platform version. All above data should be correctly archived and should be available as an index when you need to create a new patch. PMT facilitates this by being the hub for all patches. Any developer who creates a new patch obtains the patch number for his work from PMT.

WSO2 support system involves many developers working parallel in different or same product components, based on the customer issues they are handling. In such space, it is important to have meta data such as the jar versions that are patched, commit revisions, patch location, integration test cases, integration test revisions, developer/QA who worked on the patch, patch released date to be archived. These information are needed at a time of a conflict or an error. PMT facilitates an environment to capture these information.

So as described in above the main purposes of PMT are managing patching process, generating patch numbers, archiving patch metadata and providing search facility. This was initially  introduced and designed by Samisa as a pet project for which Lasindu, Pulasthi helped with writing extensions as part of their intern projects and Yumani with QAing.

To cater the project requirements, WSO2 Governance Registry was chosen as the back end server with WSO2 user base connected via WSO2 IS as the user store and MySQL for registry. Later WSO2 User Engagement Server was integrated as  the presentation layer, using Jaggery framework to develop the presentation logic. From WSO2 G-Reg, we are using the RXT, LifeCycle and handler concepts, search/ filtering facilities and governance API. From WSO2 UES we are using webapp hosting capability. WSO2 IS is LDAP user store.

In the proceeding sections I will briefly describe how PMT evolved with different product versions, absorbing new features and enhancements.

First version in wso2greg-4.5.1

PMT was initially designed on G-Reg 4.5.1 version. Using the RXT concept, an artifact type called patch was built. This is to capture all metadata related to a patch. It also defines a storage path for patch metadata, a listing view which provides a quick glance on the existing patches. Few important parts of the rxt is discussed below;

Our requirement was to capture data on JIRA's basic information, client/s to whom its issued, people involved, dates, related documentation and repositories. So the RXT was categorized into tables as Overview, People Information, JIRA Information, Patch Information, Test Information and Dates.

<content>
<table name="Overview">
</table>
<table name="People Involved">
</table>
<table name="Patch Information">
</table>
<table name="Test Information">
</table>
<table name="Dates">
</table>
</content>

Each above <table> has the attributes related to them. Most of these were captured via <field type="options"> or <field type="text">

Above RXT (patchRXT) was associated to a Lifecycle to manage the patching process. Patch LifeCycle involves main stages such as Development, ReadyForQA, Testing, Release. Each above state includes a set of check list items, which lists the tasks that a developer or QA needs to following while in a particular Lifecycle state.

Sample code segment below shows the configuration of the 'testing' state:

  <state id="Testing">
                    <datamodel>
                        <data name="checkItems">
                            <item name="Verified patch zip file format" forEvent="Promote">
                            </item>                           
                            <item name="Verified README" forEvent="Promote">
                            </item>
                            <item name="Verified EULA" forEvent="Promote">
                            </item>
                            <item name="Reviewed the automated tests provided for the patch">
                            </item>
                            <item name="Reviewed info given on public/support commits" forEvent="Promote">
                            </item>
                            <item name="Verified the existance of previous patches in the test environment" forEvent="Promote">
                            </item>
                            <item name="Auotmated tests framework run on test environment">
                            </item>
                            <item name="Checked md5 checksum for jars for hosted and tested" forEvent="Promote">
                            </item>
                            <item name="Patch was signed" forEvent="Promote">
                            </item>
                            <item name="JIRA was marked resolved" forEvent="Promote">
                            </item>
                        </data>   
                         <data name="transitionUI">
                            <ui forEvent="Promote" href="../patch/Jira_tanstionUI_ajaxprocessor.jsp"/>
                            <ui forEvent="ReleasedNotInPublicSVN" href="../patch/Jira_tanstionUI_ajaxprocessor.jsp"/>
                            <ui forEvent="ReleasedNoTestsProvided" href="../patch/Jira_tanstionUI_ajaxprocessor.jsp"/>
                            <ui forEvent="Demote" href="../patch/Jira_tanstionUI_ajaxprocessor.jsp"/>
                        </data>                                        
                    </datamodel>
                    <transition event="Promote" target="Released"/>
                    <transition event="ReleasedNotInPublicSVN" target="ReleasedNotInPublicSVN"/>
                    <transition event="ReleasedNoTestsProvided" target="ReleasedNoTestsProvided"/>
                    <transition event="Demote" target="FailedQA"/>
                </state>

As you may have noticed the Lifecycle transitionUI in which user is given an additional interface in between state changes. In above, on completion of all check list items of the testing state and at the state transition, it pauses to log the time that was spent on the tasks. This information will directly update the live support JIRA and is used for billing purposes. The ui-handlers were used to generate this transition UI dynamically. Later in the cycle wee removed it when Jagath and Parapran introduced a new time logging web application.

The various paths that the patch might need to be parked given the environment factors, we had to introduce different intermediate states such as 'ReleasedNotInPublicSVN', 'ReleasedNoTestsProvided'.  <transition event> tag was helpful in this. For example a patch can be promoted to 'released', or 'ReleasedNotInPublicSVN' or 'ReleasedNoTestsProvided' states or it can be demoted to FailedQA' states using <transition event> option. 


Performance Issues in G-Reg 4.5.1

When compared with the low concurrency rate we had at the time, the response time was high while PMT is hosted in G-Reg-4.5.1. This was even observed in JIRA details page. Suspect was that a *social* feature which pops up worklist items in the UI, as per the design at the time, use to run at each page refresh. Also there was a delay when working with Lifecycle state checklist items too.

Migrated to G-Reg 4.5.3

Considering the performance problems and some of the new enhancements to RXTs, PMT was migrated to G-Reg 4.5.3. Migration process was very smooth; there were no database schema changes. We were able to point to the same database that was used earlier. Above issue was solved in new version of G-Reg.

There was also RXT related enhancements, where we could now have a pop-up calender for dates opposed to the text box in the previous version.Filtering; In the earlier version patch filtering was done through a custom development which we had deployed in CARBON_HOME/repository/component/lib. But in the new version this was an inbuilt feature. There were also enhancements in G-Reg's governance API that we could laverage in generating reports and patch numbers. 

Moving historical data to live environment.

Prior to PMT, there was a use of Google spreadsheets to maintain patches related metadata. Since PMT is being used as repository to 'search' patches and related information; it was time to move old data also into PMT. All the previous data that were captured in 6 different spread sheets were moved to PMT. This involved data analysis, since some of the field names were different from spreadsheet to spreadsheet and from spreadsheets to PMT. After background adjustments, Ashan from support team moved the historical data by retrieving data from spreadsheets using dataservices and writing them to PMT using a RemoteRegistry API  [2 -svn location of gov-api code].

This added 900+ patches to the live system and also effected performance as below. This was done using data service to get data from spreadsheets and a java client to add them to PMT [attached].


Looking for new avenues

Scalability:

With the patch database becoming larger by data migrated from archives, as well as PMT being used daily by rotational support teams; there arose an issue where you get an unpredictable stability issues. PoolExhaustedException was one of which that was reproducible when the loaded database is idle for couple of days[1].

After checking into details, leading G-Reg engineers Ajith, Shelan proposed some changes to data-sources configuration which helped.

Introduced 'removeAbandoned' and 'removeAbandonedTimeout':
<removeAbandoned="true"
removeAbandonedTimeout="<This value should be more than the longest possible running transaction>"
logAbandoned="true">

Updated 'maxActive' to a higher value than the default value of 80.
<maxActive>80</maxActive>

But we had couple of more problems, we noticed that it the response time for listing the patches is unreasanably high. Some of the reasons that were isolated with the help of Ajith was that the default setting for versioning which was set to true. In G-reg Lifecycle related data used to be stored storing as properties, so when <versioningProperties>true</versioningProperties> is set, it massively grows the REG_RESOURCE_PROPERTY and REG_PROPERTY tables with the resource updates.The patch LifeCycle (contains 20 check list items) , when one patch resource going through all the LC states, it is adding more than 1100 records to REG_RESOURCE_PROPERTY and REG_PROPERTY when versioning is set to true.

Summary of Ajith's tests;

Versioning on:
Adding LC : 22
One click on check list item : 43
One promote or demote: 71.

Versoning off:
Adding LC : 22
One click on check list item : 00
One promote or demote: 24.

As a solution following were done;
1) Created a script to delete the unwanted properties

2) Disabled the versioning properties, comments and Ratings, from static configurations in registry.xml [2 - https://wso2.org/jira/browse/REGISTRY-1610]
<staticConfiguration>
<versioningProperties>false</versioningProperties>
<versioningComments>false</versioningComments>
<versioningTags>true</versioningTags>
<versioningRatings>false</versioningRatings>
<servicePath>/trunk/services/</servicePath>
</staticConfiguration>

There was also another bug found related to artifact listing. There is a background task in G-Reg to cache all the generic artifacts. That help us to reduce the database calls when we need to retrieve the artifacts(get from cache instead of database).In G-Reg 4.5.3 it doesn't work for the custom artifacts such as patchRXT and it only works for service,policy,wsdl and schema.This issue was patched by the GReg team.

Process Validation:

With increase of number of users daily basis, fastening link with the process became very important. The existing UI at that time was G-Reg management console, but our requirement was to validate Lifecycle events with data in RXT.


Jaggery based web application and GReg upgrade

GReg migration to 4.6.0 version was done by Parapran to overcome above issues which was known and fixed in new GReg and a new jaggery based web application was developed by support intern at the time, Nazmin as per Yumani's design and Jagath and team's valuable feedback.

The intention of the new PMT application was to provide a very user friendly view and to assure the developers of the patches follow all necessary steps in creating a patch. For example a developer cannot proceed from the 'development' state if he has not updated the support JIRA, public JIRA, svn revision fields. If he selects to say automation testing is 'Not possible' he has to give reasons. If he has done tests, he has to give the test commit location etc. Yes, we had occasional disturbed use cases. Special thanks to Paraparan and Ashan who fixed these cases with no time.


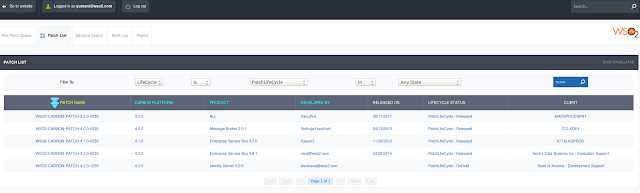
Image 1: Patch Listing


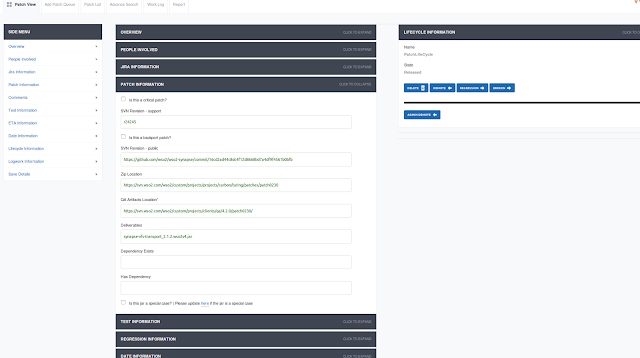
Image 2: Patch Details

This application was highly appreciated by the users as it allowed auto generation of patch numbers, pre-populated data for customer projects, users, products and versions etc. As promised it duly validates all mandatory inputs by creating a direct bind to user activities.

Today, the application has been further developed to capture various patch categories such as ported patches, critical patches, preQA patches. GReg based life cycle is also further developed now to cator pre Patch creation and post patch creation tasks. It was Inshaf who implemented these enhancement. We are also working on new features such as updating customers with the ETAs for patches based on three point estimation, looping leads and rigorously following-up in delays.

The application was also deployed in an HA setup by Chamara, Inshaf and Ashan for higher scalability, where the back-end GReg is clustered to 4 nodes fronted by Nginx which is sitting between the client application and the BE. We have about 100+ engineers accessing this application daily with around 15 concurrency for adding patches to patch queue, generating patch numbers, progressing patches through patch life cycle and searching for meta information.

Additionally the PMT database is routinely queried for several other client programs such Patch Health clients, where we generate reports on patches which are not process complete, Service Pack generation where the whole of database is read to extract patches belonging to a given product version and its kernal, Reports for QA at the time of the release testing where they seek for use cases patched by the customer. Most of these client applications are written using governance API.

PMT is a good example of a simple use case which expanded to a full scale system. It is much used in WSO2 support today and we extended it to have many new features to support the increasing support demands. We have been able to leverage Jaggery framework to all UI level enhancements. Governance registry's ability of defining any type of governance asset and customizable life cycle management feature pioneered the inception of this tool and helped in catering the different data patterns that we wanted to preserve and life cycle changes that needed to be added later according to the changes in the process. We were able to add customized UIs to the application with the use of handler concept in GReg. When the front end jaggery web application was introduced, we had a very seamless integration since the back-end could be accessed via governance API. Increasing load demands were well supported by Carbon clustering and high availability concepts.

Featured

Selenium - Page Object Model and Action Methods

  How we change this code to PageObjectModel and action classes. 1 2 3 driver . findElement ( By . id ( "userEmail" )). sendKeys (...

Popular Posts